So why do I use a V-bracket on my Nomad setup?
So why do I set up my Nomad tracker with a v-bracket? (Spoiler, the answer is panoramas, but we will get to that later). When I post about my Nomad setup, phone holders or levelling tools any image that includes a v-bracket tends to get lots of derisive comments (well meaning I am sure) along the lines of “why don’t you just use a ball head”, “they are not strong enough to support a real camera” or “they add heaps of vibration and ruin your photos!”
Now I am sure everyone who makes these kind of comments has used and had some kind of negative experience so it is quite reasonable. But I thought I might try an dispel a few myths and explain why I personally made the deliberate choice to use a v-plate in my setup with, I think, a degree of success.
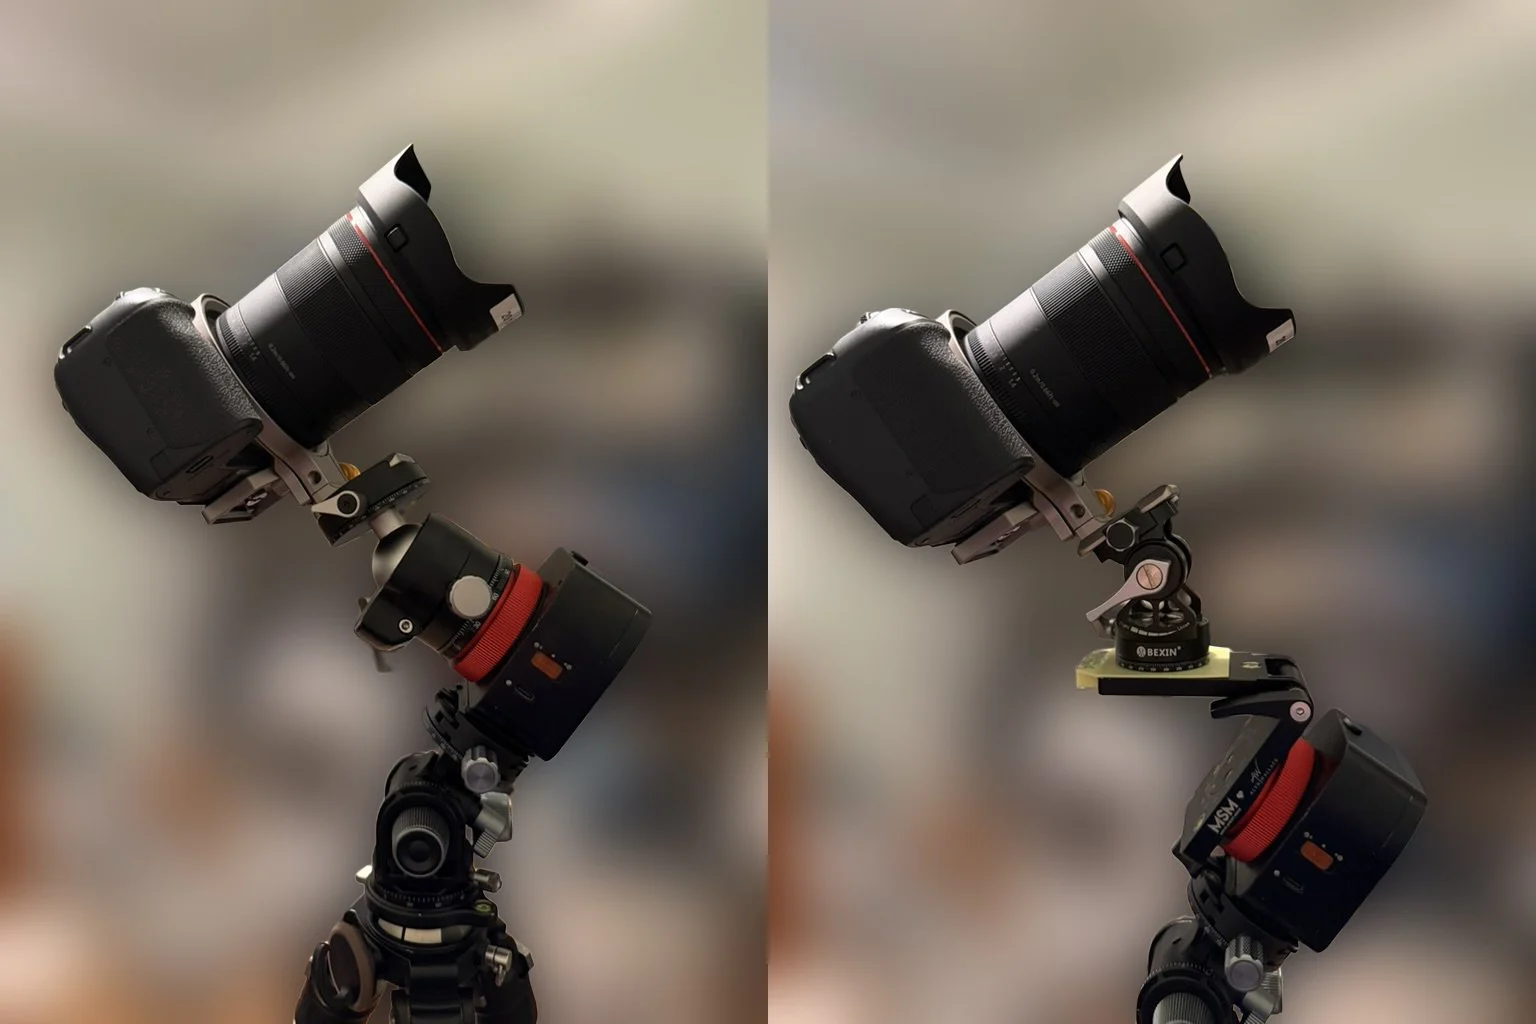
Two of the (many) options for mounting a camera on a tracker. In the one on the right the camera is mounted on a ball head directly attached to the tracker. This is really stable and works really well for pointing at a single object in the sky. In the setup on the left, the camera is mounted on a small panning head on a v-bracket attached to the tracker. Even though in both setups the camera is pointed at the sky and not level, with the v-bracket the rotation of the panning head is (or at least starts out) level, making it much easier to sweep the camera around to do a multi shot panorama.
The first caveat I make is that the choice depends on your use case and preferences. If I am just trying to shoot a deep sky object with no foreground in a single set of stacked images without repositioning the camera, I probably would just attach a ball head to the front of my Nomad and go for it. Generally (assuming that the location of the object in the sky won’t lead to the camera and tracker clashing) it is reasonably easy to line up an object using the ball head and once the subject is framed you don’t need to move anything and all is sweet. This setup has the least number of joints and parts between the tracker and camera which means the least amount of vibration and possible points of failure (that is, slipping joints that let the camera move under its own weight). But that is not how I tend to use the ultralight and portable Nomad. (I actually have a telescope and goto mount for that kind of thing, spoilt I know).
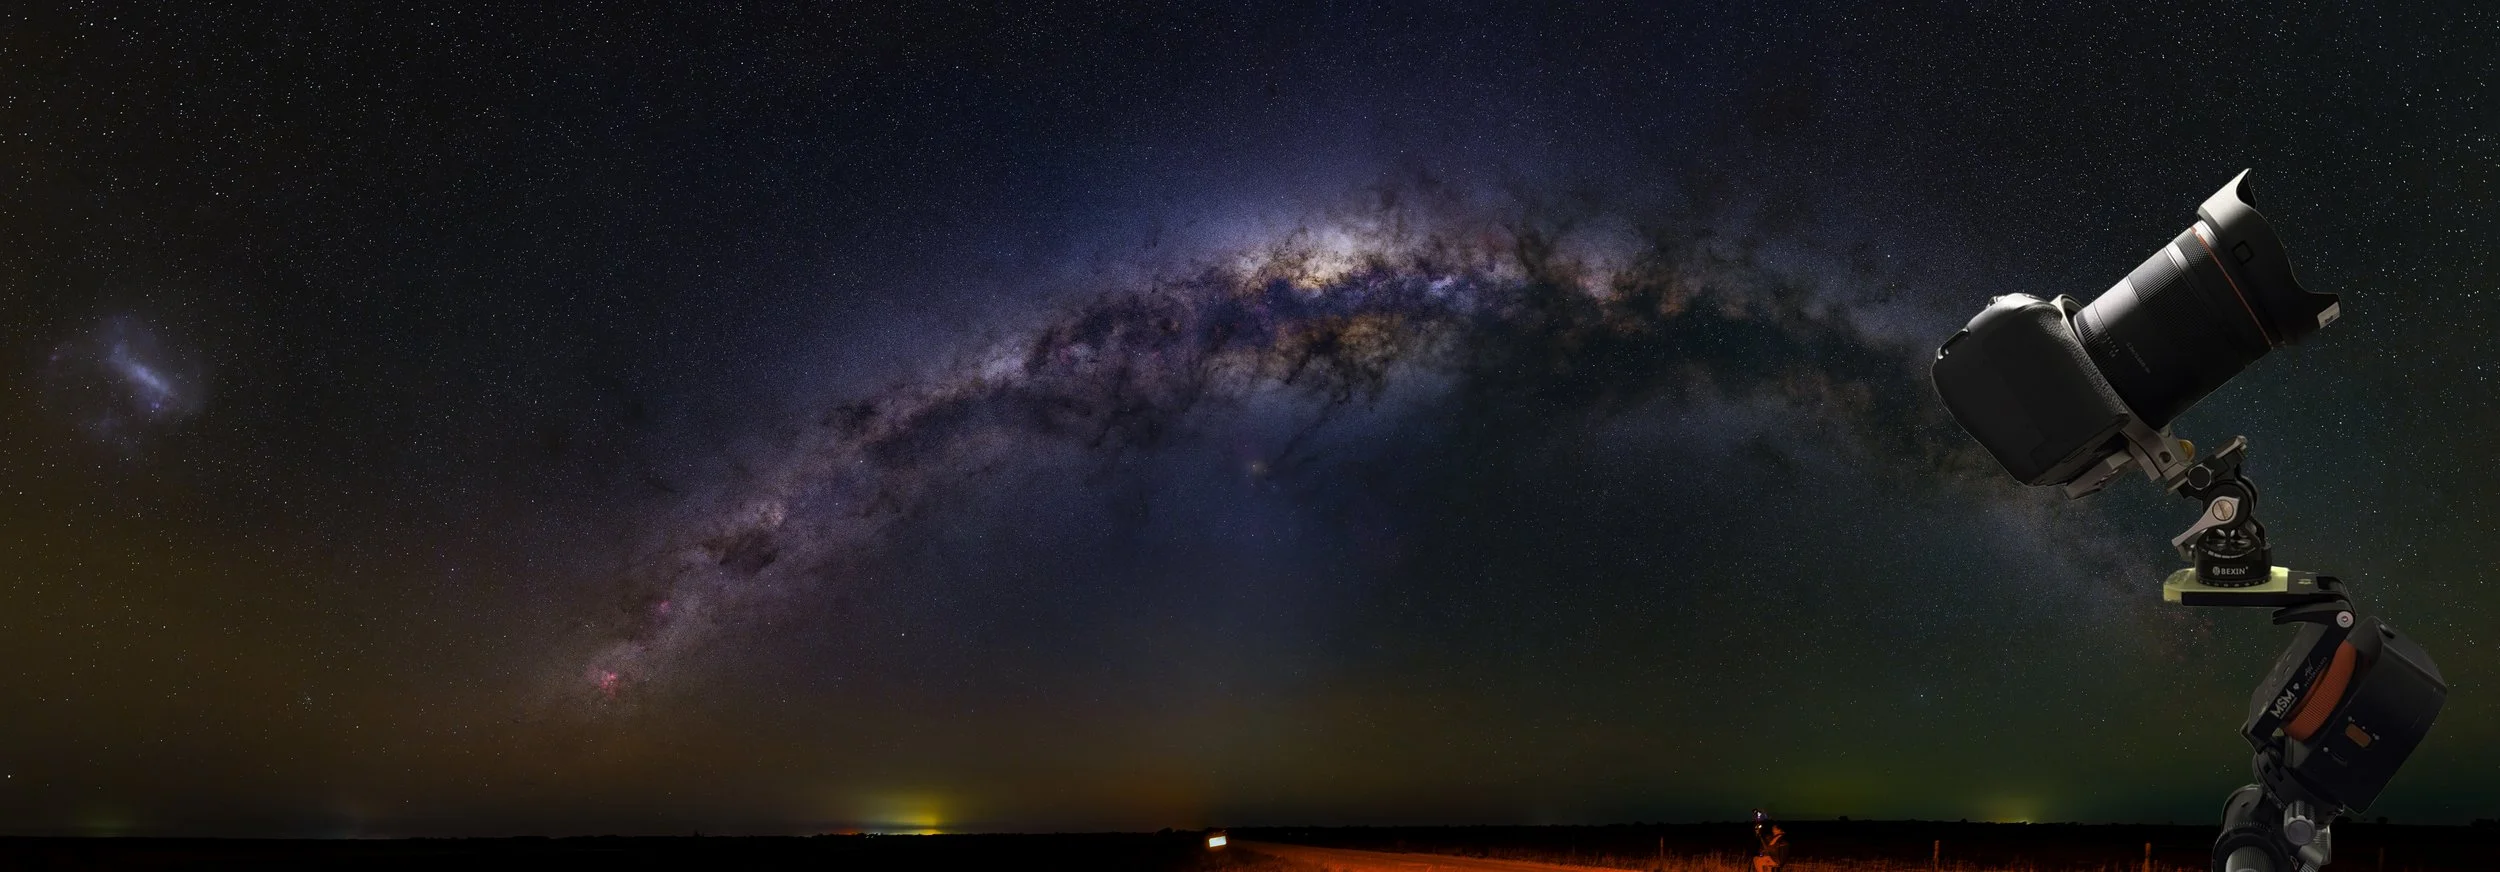
I use the Nomad for astro-landscapes (nightscapes) in the field which combine foreground landscapes and sky images and often require multi-shot panoramas to fit it all in.
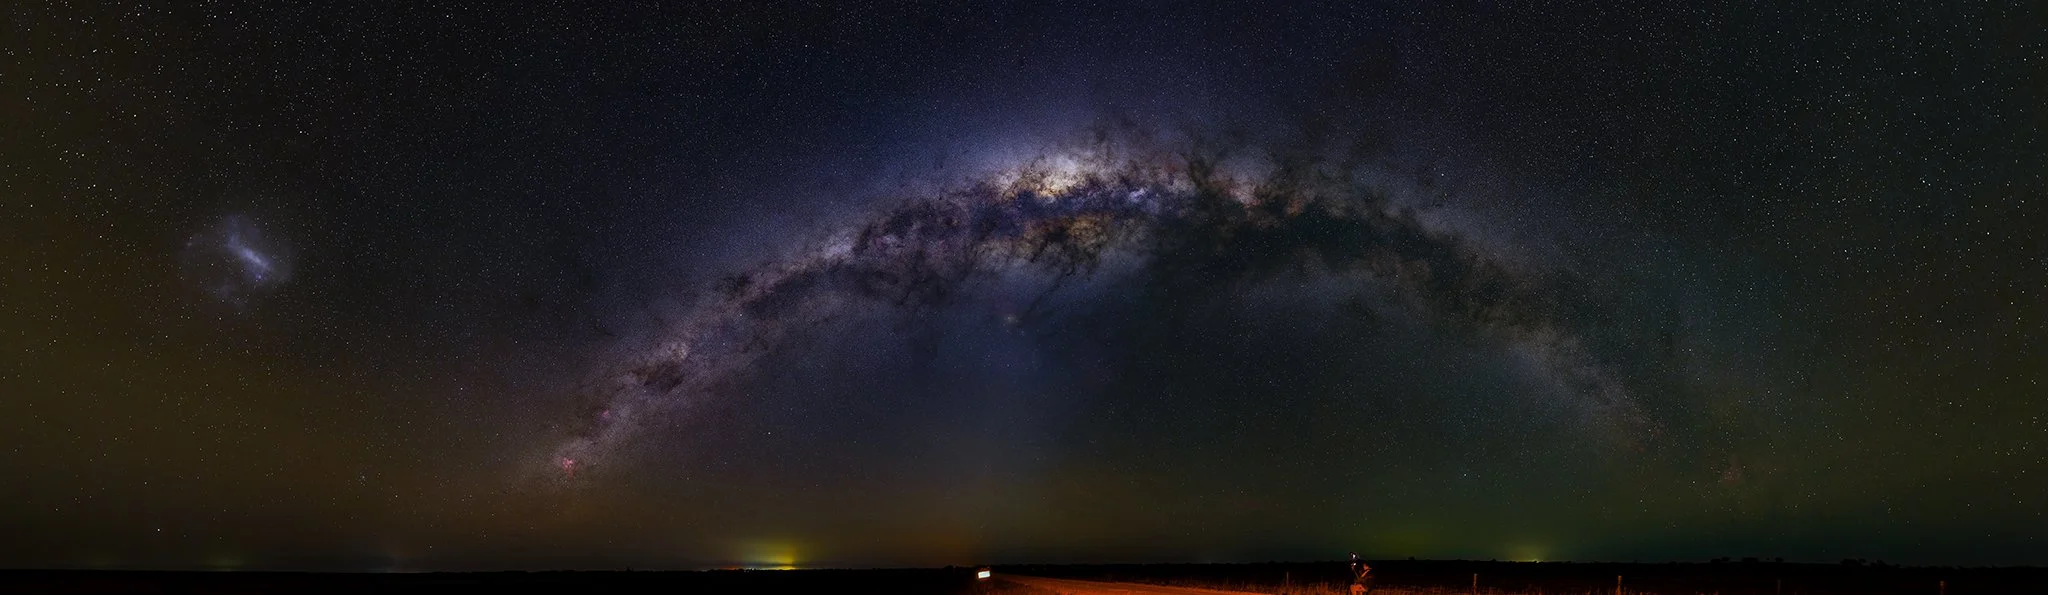
This is a typical use case for me, a tracked Milky Way panorama involving 2 rows each of 7 images in portrait format. The whole panorama took around 20 minutes to shoot with each exposure one minute long (ISO 800, f/2.0, 20 mm). This is much much easier to achieve starting with a level base and a panning head as shown in the lefthand image above.
The importance of being level
It is when we start talking about multi-shot panos that the v-bracket really comes into its own. Stitching a panorama is always easier if you minimise the distortion and angle changes as you sweep from one side of the image to the other. Achieving this is most easily done by making sure the rotational (or sweep) axis is perpendicular to the horizontal, that is, level. The camera itself does not necessarily need to be level, just the axis you sweep it around. Now when doing a normal pano in daylight we can just level our tripod and use a tripod head with a rotation axis on the base.
When we mount our camera on a tracker it gets a little more difficult because we now need to introduce polar alignment to our setup. Unless you happen to be at the North or South Pole the mounting point of your tracker will not be level (but wouldn’t it be cool to shoot night sky shots from those locations). It needs to be at an angle that is the same as your latitude to be polar aligned (check out this blog post for some more information).
This is where the v-bracket comes in. We can attach it to the face of the tracker and then open it up so it forms a level base to attach either a ball or pano head (see the image at the beginning of the blog). Now we can point the camera itself in whatever direction we like and as long as we rotate it using a rotator at the base of the head it will sweep in a manner nice and parallel to the horizontal. Obviously this level will change as the tracker rotates, but this is reasonably slow (about a quarter of a degree per minute) and is only in one axis so the stitching is still relatively straight forward. You can see the results of an out of level pano in the images below. Examples of level and non level panoramic sweeps are shown below.
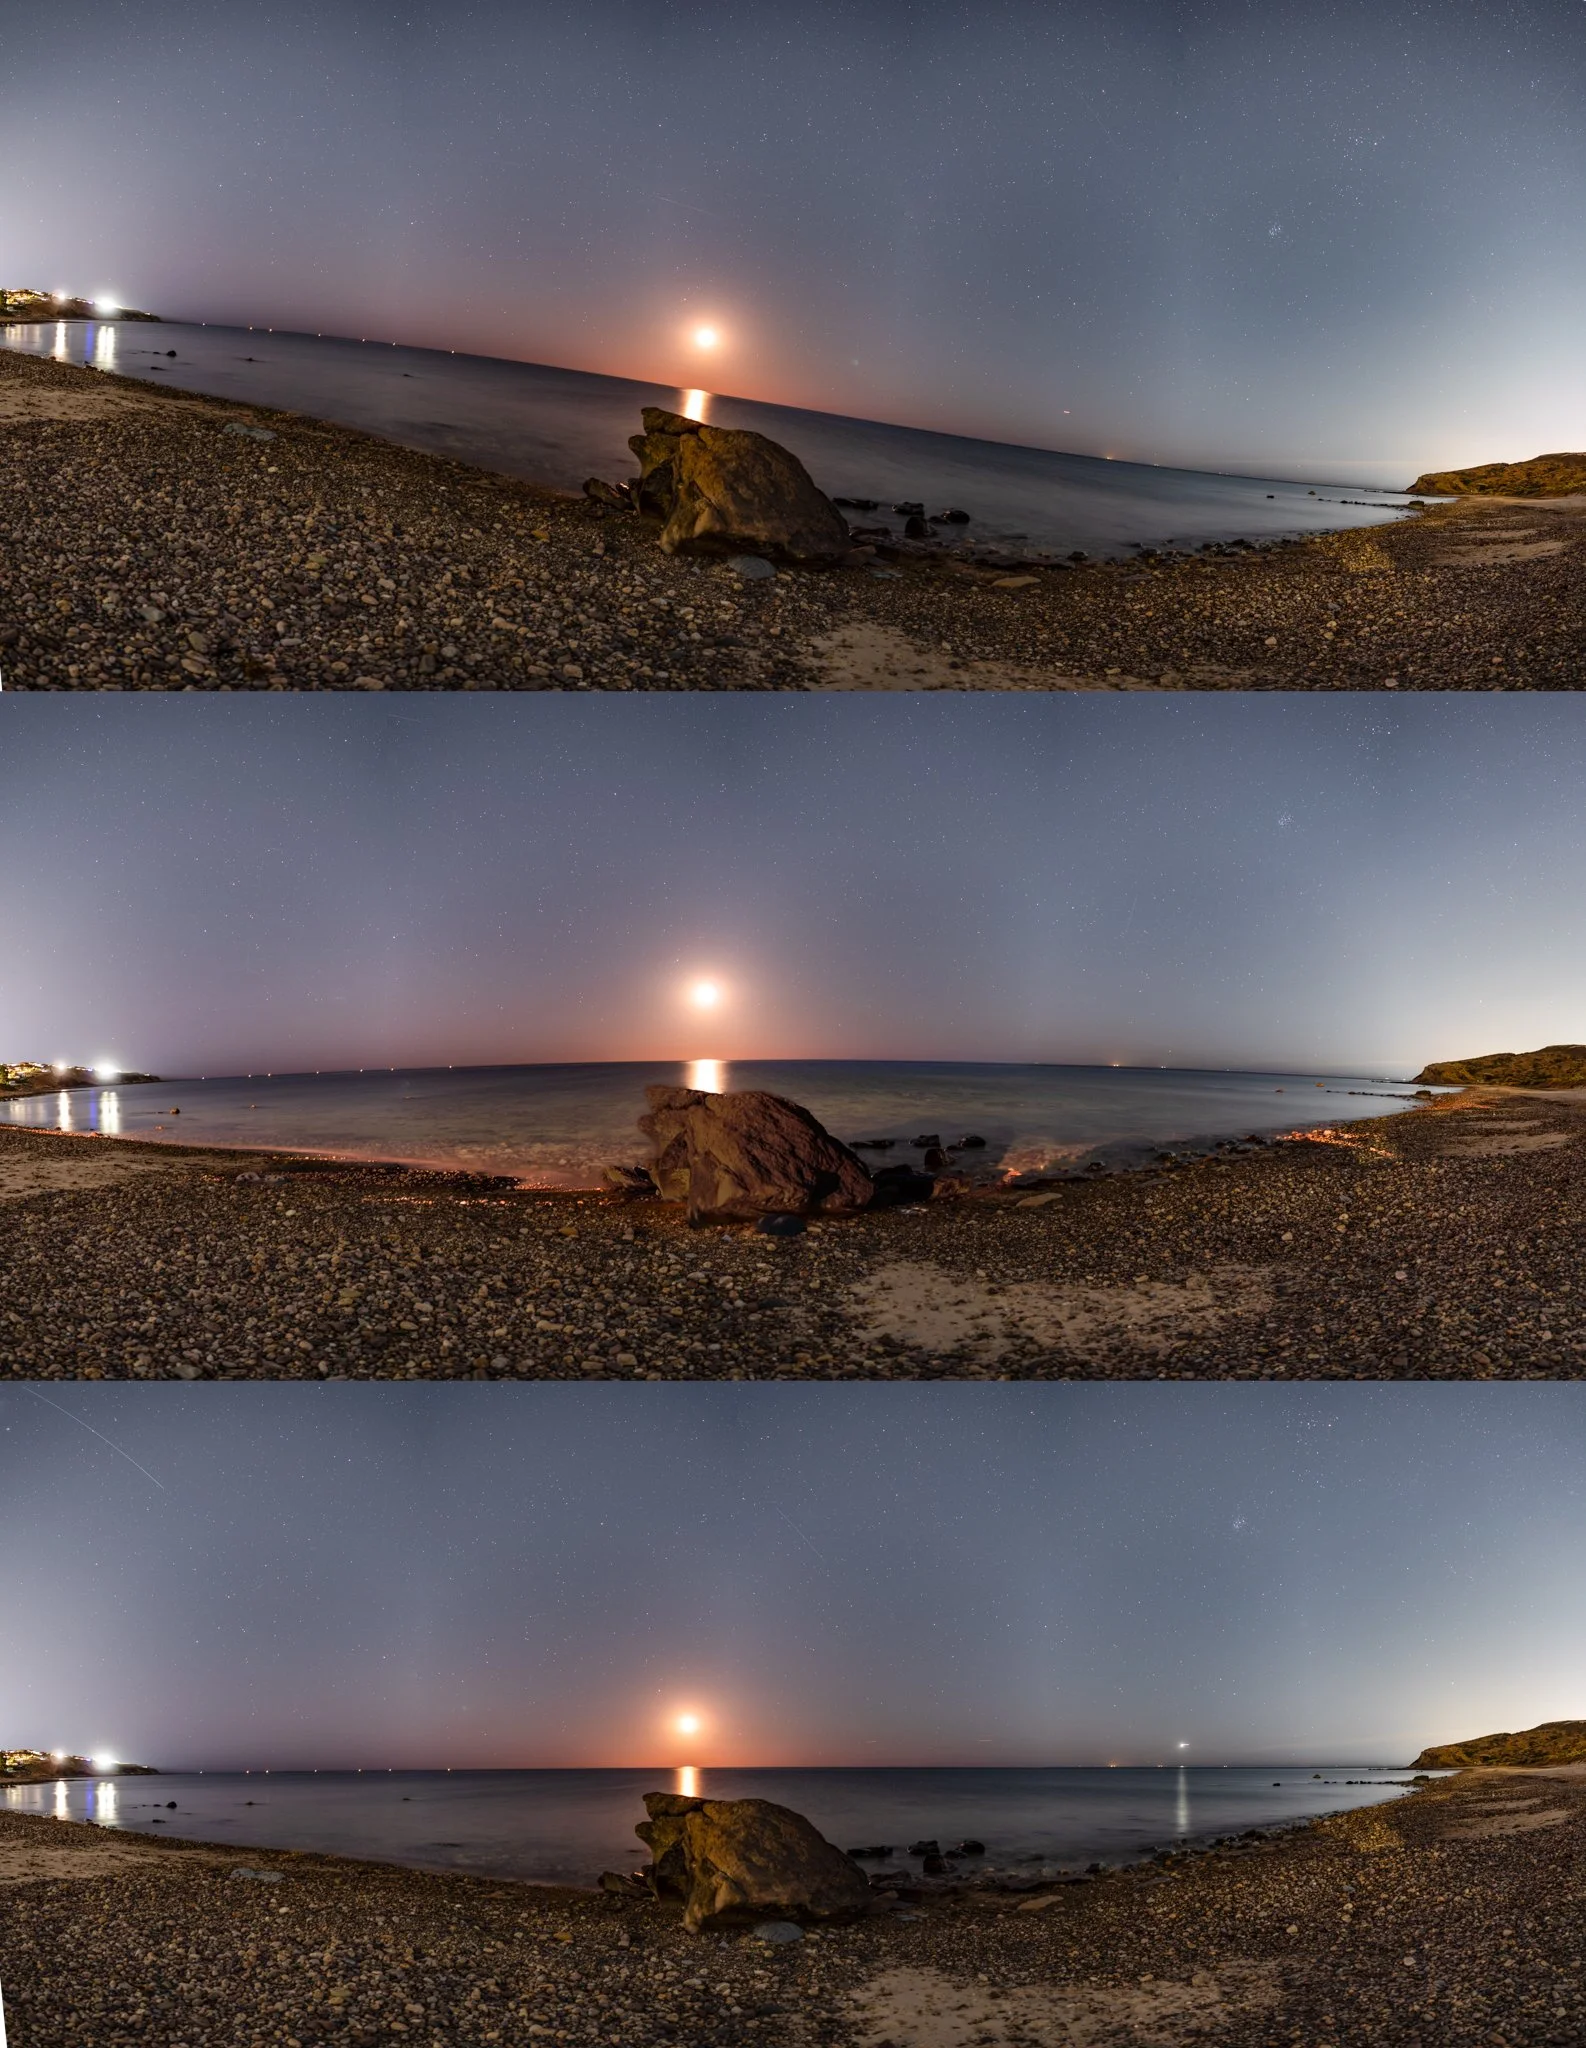
3 panoramas, all shot with a 20mm lens and tracking turned on. In the top one the base of panning head was out of level in both the x and y axis leading to the fun s-curve in the horizon. In the second one the camera said it was level when composing the image at the centre of the image, but the v-bracket was out of level in the direction the camera was pointing leading to the slight bow in the horizon, easy enough to fix with good stitching software, but that will always add some extra distortion. The bottom image was done with the plate levelled in both axis before starting the pano. Each pano was done with 5 images of 30 second exposure and stitched in LightRoom using a spherical projection.
Some pano night-scape specialists like John Rutter Photography (check out his YouTube channel, really worth it) actually re-level their head every few shots of the pano which is easy to do using the MSM Alyn Wallace v-plate as it has a rotation adjustment you can easily shift to counter the rotation (big warning, don’t do this between stacked images, definitely counter productive). I don’t tend to make this adjustment as I have usually finished each row of my pano in under 15 minutes (often in less than 10) and the stitching software seems to deal with it reasonably well. As always, however, it is important to do what works for you.
Can you achieve the same pano just using a ball head attached directly to the tracker? Sure thing, been there done that. It is just immeasurably easier to judge the rotation, overlap and relative position of each shot with this kind of set up, and I always love things to be easier. I also find that moving the the camera around on a ball head attached directly to the tracker increases the likelihood of me bumping the tracker out of polar alignment. This may be more a function of my clumsiness, but seems to happen less with my current setup.
Even when I am not doing panoramas I find starting off with the camera on a level base is more convenient. For reasons which are just part of my way of working, I find that it is easier to organise my sky and foreground shots if I am starting with the head which the camera is mounted on (assuming I am using a tracker) is level before each set of shots. Having these well sorted out makes the blending process a lot smother, especially as I am pedantic (for my work) about the sky being in the real position for the foreground (which I always shoot on the same night, not judging, just what I do). One of the problems you can have if you get the angles wrong is when you go to blend an image you will find you need to rotate the sky image quite a bit which can result in a missing chunk of sky at the horizon, which is never good. Starting with a level base above the tracker does not solve this, but it does make the planning a bit easier.
So what about the vibration problems and slipping?
Does it introduce more vibration? I honestly have never found this in the use cases that I am using it for. Admittedly it would be unusual for me to shoot at anything longer than 50mm with this setup and I don’t think the extra minor vibration introduced at this focal length is really that noticeable except in high wind, and here the tripod etc will likely be just as much of a problem. At longer focal lengths it may be an issue, but as I said at the beginning of this blog, that is not what I would tend to use this setup for.
When I first started using the v (and originally the z-bracket) on the original MSM rotator I did have some real problems with the bracket slipping. The original little levers on the brackets were hard to tighten enough when using a biggish combination of camera and lens (the heaviest combination I tend to use is the canon R5 with a Sigma 40mm f1.4 art which is pretty weighty). This is especially an issue on cold nights when it was hard on cold fingers or in gloves. My simple fix for this was to make a small spanner out of wood with a few holes drilled in it to fit over the lever. This allowed me to apply a lot more torque to the lever with one hand while holding the bracket steady with the other. Doing this took away all the problems and I have not had any issues since. The new longer levers that are available for the brackets now are much better, but I always keep a copy of my tightening tool (now 3d printed and with holes for both kinds of levers, link for download here) in my bag.
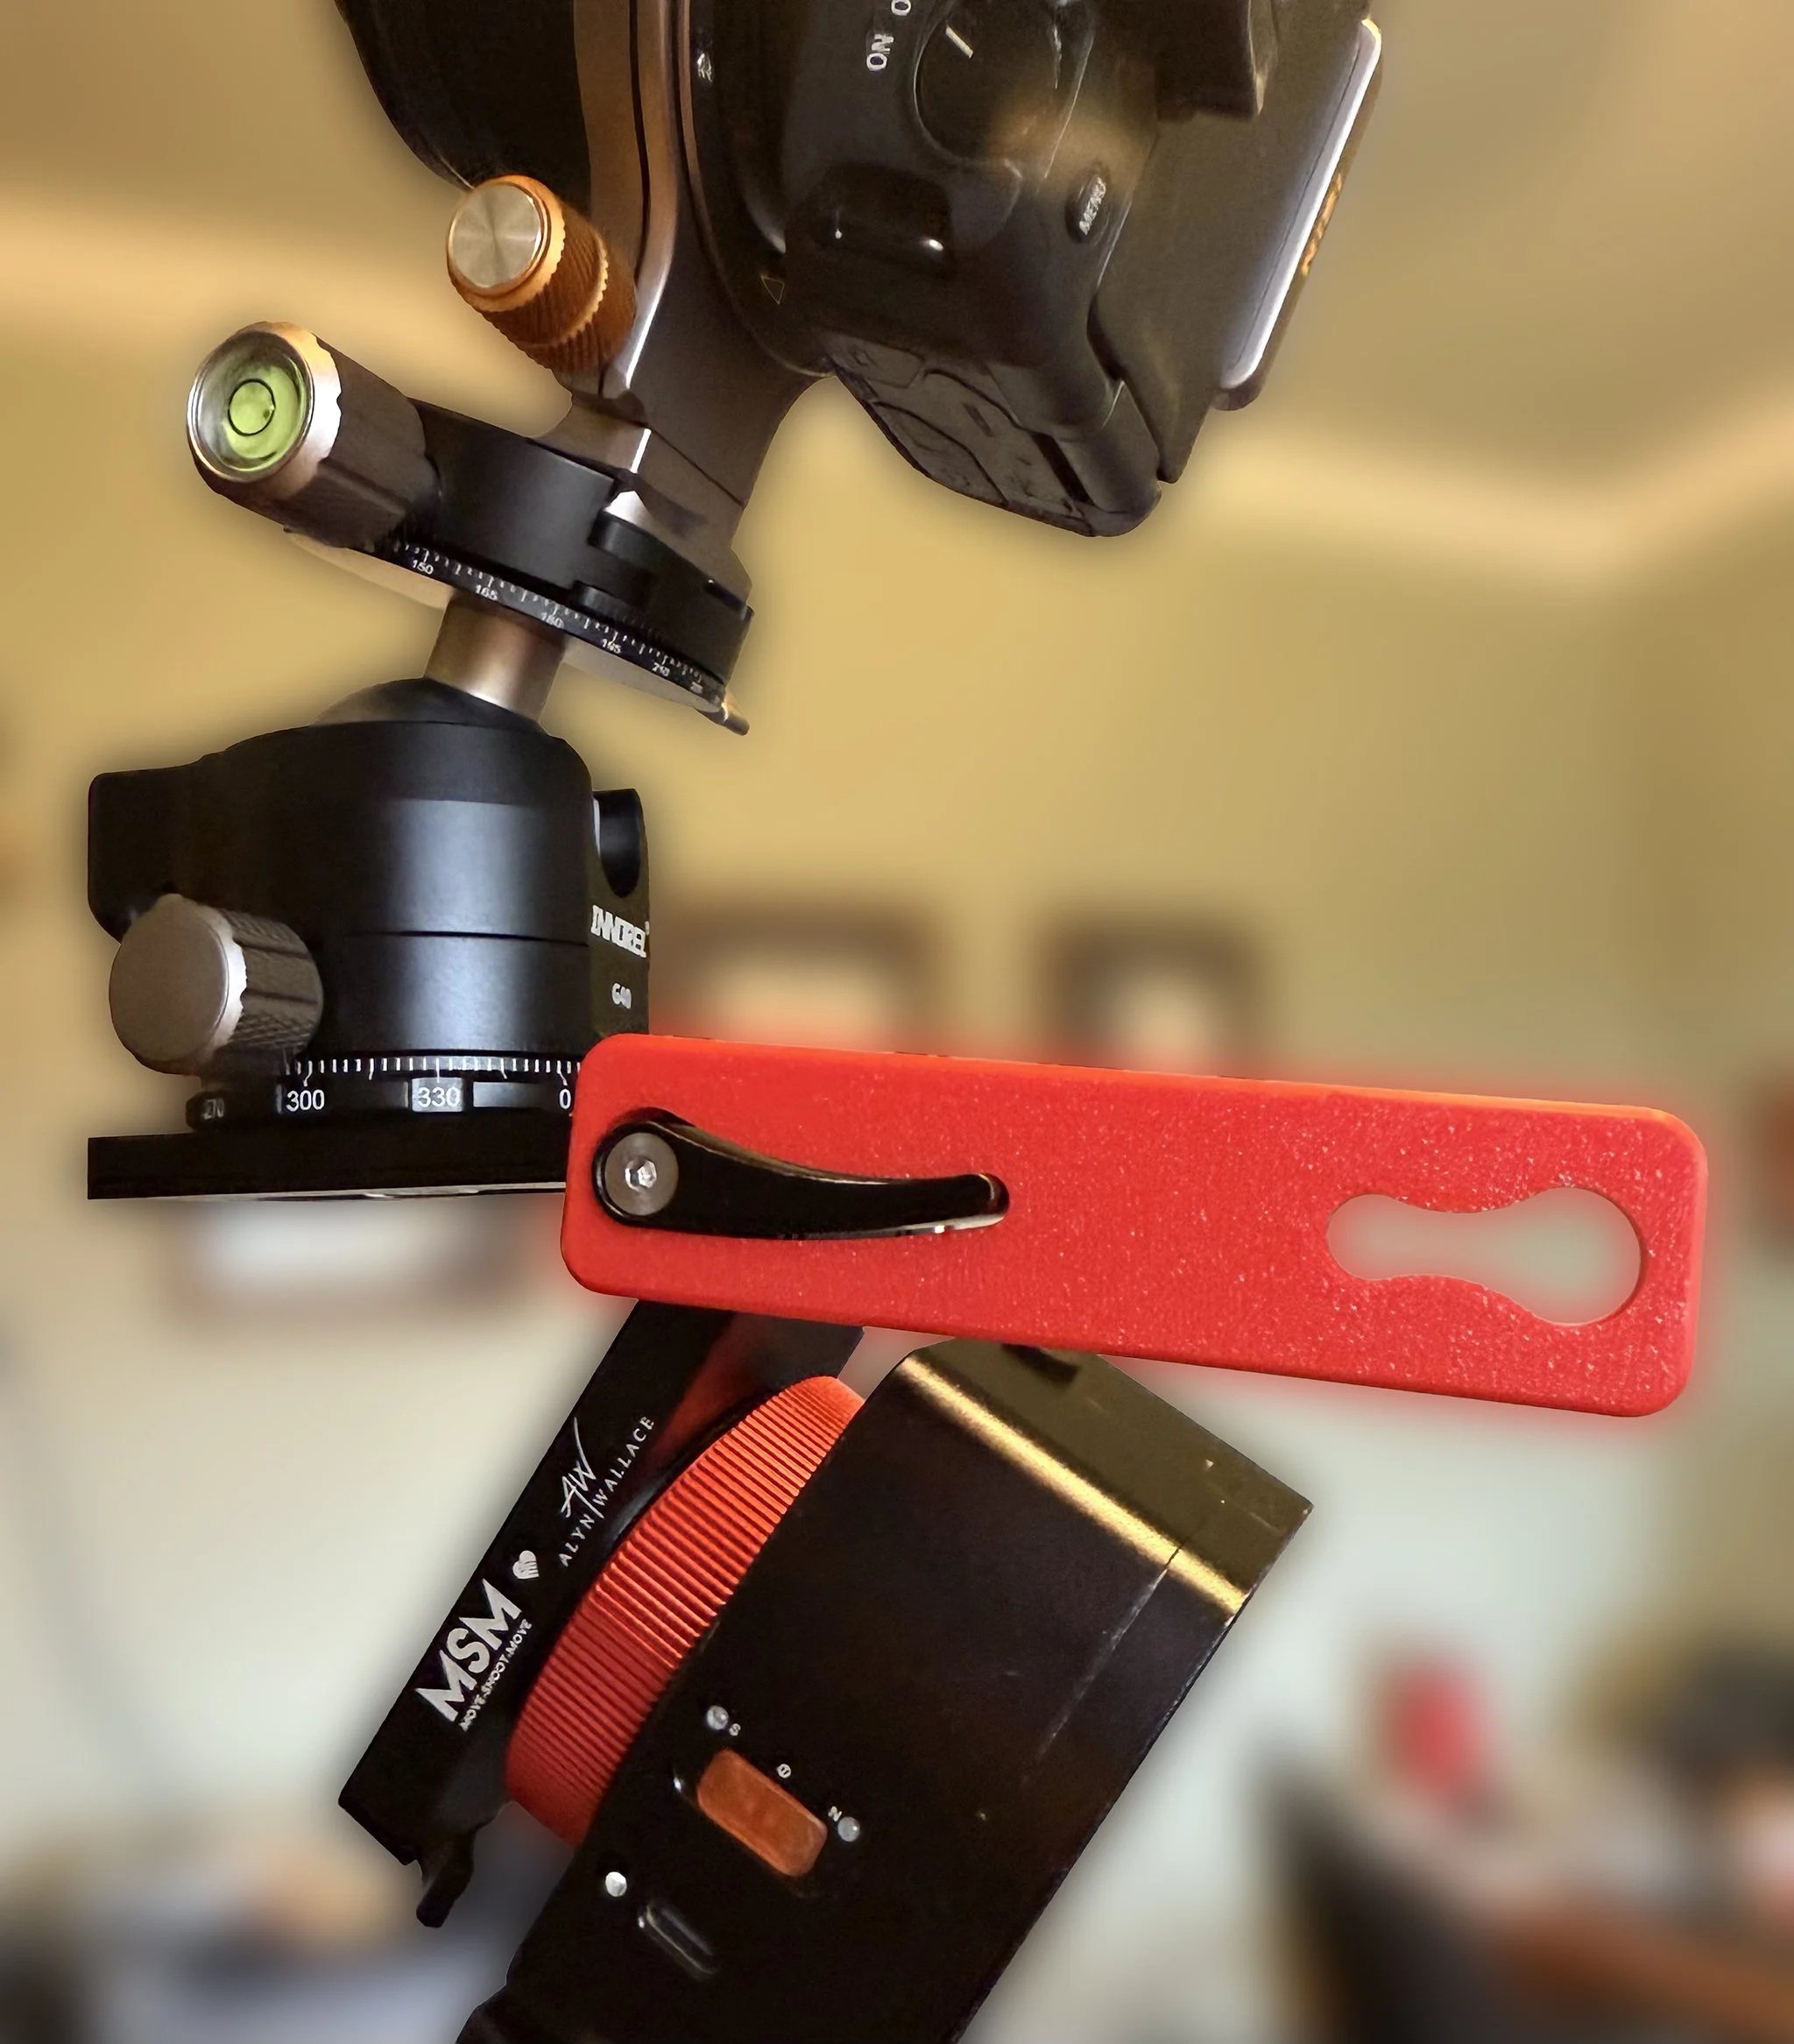
A simple tool to make it easier to tighten the levers of the v-bracket to prevent it slipping.
Is it perfect?
Could the v-bracket (personally never use the z-bracket these days) be improved. Absolutely! I would love the hinge design to be improved so it did not require as much torque to tighten. I would also like some decent bubble levels to be incorporated into two edges rather than the tiny little one of dubious accuracy in the top. Overall, however, it is a really useful piece of kit in many situations and very much suits my needs. I can see why the late Alyn Wallace was happy to put his name to it as it helped overcome some of the problems he faced in his work, and I think we can all agree he definitely knew what he was doing.